Posts

Showing posts from 2011

Wish our son could be here

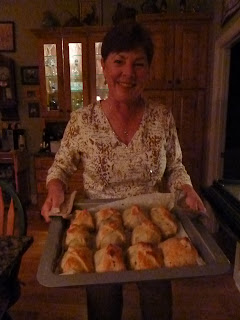
All the projects are finished. Baking is done. Prime rib is seasoned and ready for the rotisserie over the grill. Presents are wrapped. Our daughter, Amber, arrived safely... But, our son, Brit couldn't get here from Japan. It's a long way... We miss him. This is the third Christmas he's missed. The US Navy keeps him busy. To all of you who are missing loved ones around the table tomorrow... I send you my warmest hugs. I know how you feel. Merry Christmas and a most wonderful New Year to all. Hugs from Mary

Little Vacation

Image
Well, DH thought it would be fun to head down to Hilton Head Island for a little golf... We have friends visiting from CA, and they think it's also a grand idea.  I do too, but none of them smiled when I asked if I could take my sewing machine. DH thinks the golf clubs will keep me busy. DOES NO ONE UNDERSTAND THAT THIS IS THE BUSIEST TIME OF THE YEAR FOR A QUILTER???  Smile, Mary... Take a deep breath, Mary... Remember, no cooking dinners for the next 5 nights... Oh, yeah ;-)  That's a good thing. Besides, think how satisfying it will be to picture DH's face on the golf ball every time I hit it! (just kidding - I love him dearly) Here's a poor picture of my latest art quilt that sold for $150 at our garden club's charity auction... I'm very happy about that! The pine boughs were FMQed with a double needle using two tones of green thread. I also left loose threads on the egret to look like feathers blowing in the wind. Keep stitchin' for the ones you l

Wooden Quilt Address

Image
The quilt block is finished and attached! The darling DH getting the job done!  The big picture... Our sweet little dream cottage on the golf course; near the beach  now has a beautiful quilt to showcase the house numbers! The neighbors probably think it's part of the Christmas decorations. Won't they be surprised when it stays in place forever! BTW... The window above the quilt block is my sewing studio. I get the whole room over the garage all to myself! I'm just a happy camper up there ;-) Keep stitchin' for the ones you love! Holiday Hugs from Mary

Wooden Quilt Block... Finished... almost

Image
I'm finished!!! After lots of taping and delicate painting, I can now say... "I love it!" Our address numbers will stand out bold and proud on this quilt block.  The exterior of the house is the same color as the center light sage green. So, drum roll please... here it is... The next step is to spray a clear satin polyurethane to seal and protect the paint. After that DH and I will seal the plywood edges with a waterproof clear caulking and put a wood fame around the edges that will be painted the maroon/brown.  When I get the barn quilt square hung on the house with the numbers I'll post it. By the way...Head on over to Tops and Bobbins for a "Thankful" give-away! Keep stitchin' for those sweet loved ones. Hugs from Mary

Wooden Quilt Block for my house.

Image
Earlier this fall my DH and I were in the NC mountains, and adventured into Burnsville to find Needle Me This , a quilt store that had been featured in a quilt magazine. The entire shop was wonderful, but the entrance was spectacular. Right beside the front door is a beautiful painted 3'x3' quilt square, typical of what you see on barns in the NC mountains. I fell in love with that quilt block and knew that I wanted to do a smaller version of it with slightly different colors.  Here is the beautiful quilt block at Needle Me This. I am staying in the same color range, however I am not using the white and light blue. On those points I am using the light and dark gold.... And then where you see the golds in the picture I am changing that to the light and dark greens. My quilt block will be 2'x2', and our house numbers will be displayed in the center diamond. So, here is what I have to this point... Yes, I'm painting in the kitchen... on the granite counter-top...

Proper Dress Attire for Quilting

So Dick, my DH, comes home from golf... (which means he left 4+ hours ago)... looks at me and informs me I'm still in my PJs at 2:00 in the afternoon.  I of course tell him that I'm dressed..(I've even pulled on a pair of shorts). But he won't accept that! It seems I'm still in the t-shirt I slept in.  Now here's the part I like... if you pull on a bra, technically you could go outside, so technically you're dressed... Right??? I've even brushed my teeth, had coffee, cleaned the kitchen... Hey! I'm more creative in a comfy t-shirt! Miss Puny Puss, my quilting buddy, is quite content with my appearance. I've got a plan... someday soon Mr. Dick is going to come home from golf and I'm going to be dressed in that cute little black dress, cute black strappy sandals, dangly earrings, make-up, the whole nine yards! This will by my attire for the quilting studio! Who on earth am I kidding? I'm sticking to the comfy t-shirt and pull on pants! We

"Hang it on a tree" Postcards

Image
I needed to write several thank you cards to friends. I decided to send them each a quilted postcard. I fused a fabric Christmas ornament onto a crazy quilted background and then started having some fun... Using free motion quilting, I stitched in some pine boughs. However, here's the kicker... I used a double needle!!!! How do you like that?! What a fun discovery. I used two different colors of green and went to town with a back and forth motion. It was easy to do and I love the effect. On one of the postcards I stitched in the branch with a variegated brown/black polyester thread. On the other card I just drew in the branch. Do you see the difference? I also discovered that by going side to side with a double needle I got one thick line of the two colors. Just curving slightly gave another effect. For the back of the card I fused muslin and wonder under together. I then trimmed the edges to 8.5" X 11" and ran it through my printer to get the tiny label at the botto

Completed on time... Beef Wellington!

Image
I did it! I got down to task and completed the Beef Wellington... despite numerous interruptions from my sewing machine. Every time I went upstairs to grab something my sweet sewing machine would make me lose track of what I was doing... Hours later I would think, "Oh, the gourmet group is coming for dinner tomorrow night! Shouldn't I be cooking and cleaning rather than sewing?" So here is my proof that I stayed on track, cleaned, cooked and set a beautiful table. Yeah! I look so cool and calm... Ha! What a joke! Keep stitchin' for the ones you love Hugs from Mary

Sidetracked by a postcard!

Image
Gee... wasn't I going to clean the house and then prepare the Beef Wellington?? It's only 11:10, I still have time. I was sidetracked by my friend's birthday. It's all Elizabeth's fault!! I went upstairs and there was my sewing machine begging for a few minutes of my time. I started thinking Elizabeth would love a postcard for her birthday. She would really love a picture of an egret in the salt marshes... it will only take a few minutes... I can justify anything! What fun! I think she will be very surprised! I'll be grateful if it even makes it! Keep stitchin' for the ones you love! Hugs from Mary

Birch Tree Grove, continued

Image
I'm working on the Birch Tree Grove. I want it to look like the end of summer; the leaves are just starting to turn. As you saw in the previous post, I have bits of golden yellow mixed in with the green..... But, it just looks like a big blob of green. The trunks look great (I think), but the green mass of leaves doesn't allow the eye to see separate trees. It needs more dimension...         See what I mean?.........  I want the tree with the largest trunk to come forward. I think this is where I need to know about shadowing. I did it fine on the trunk, but I'm not sure what to do with the leaves. I'm pretty sure I want to keep the center part of the green the color that it is, but as the green moves to the left and right of center it needs to get darker.  Does that make sense or am I in La La land yet again??? I think this is where the fabric pens and oil pastels come in handy. The worst that can happen is that I totally screw this up. Right?      One other thing

Christmas 2011 -- Birth of a New Tradition

Ladies and Gentlemen... we could do this... I received this as an email from a good friend, and thought, "This is the perfect post for the blog. If you would like a copy of this article to put on your blog or email to friends just leave a comment and I'll make sure you get it! >  > As the holidays approach, the giant Asian factories are kicking  > into high gear to provide Americans with monstrous piles of  > cheaply produced goods -- merchandise that has been produced at  > the expense of American labor. This > year will be different. This year Americans will give the gift  > of genuine concern for other Americans. There is no longer an  > excuse that, at gift giving time, nothing can be found that is  > produced by American hands. Yes there is! >  > It's time to think outside the box, people. Who says a gift  > needs to fit in a shirt box, wrapped in Chinese produced  > wrapping paper? > Everyone -- yes EVERYONE g

A Ghastly Party... It's BYOB!

Image
Welcome to Crooked Gulley's Ghastly Project! If you go into the city tonight you're in for a scary surprise! For every Ghastly that ever there was Will gather there for certain because... Tonight's the night the Ghastlies are having their GALA! What's that you say?? It's BYOB? I need a wine carrier that's made just for me? I've got it! I've found it!   It screams, " LOOK and SEE !" It's chic and carries the best Chardonnay, There's even more room for Merlot and Cabernet! Sparkly with pockets and secure compartments. And think of all the marvelous compliments! There's room for a cheese board, knife, and bread, Oh what a marvelous, delicious spread! Check out the pockets for napkins and corkscrew. How about the backside? It's cute and chic, too. It's simply sublime, and I'll look divine! And... now, I'm done with this silly rhyme!!!      Well... I can hardly wait for the next BYOB party at my golfing

Birch Tree Grove

Image
I'm back to being artistic and adventurous with fabric... This is where I like to be... playing with colors and pretending that I know what I'm doing! So... Here's my newest endeavor... I have several landscape art quilt books that I've noted in previous posts. Both books advise to cut out shapes and use a regular glue stick to temporarily hold them on the background. Then you use invisible thread to attach permanently. Next you shade the tree trunk sides with oil pastels. Well... and this is where I usually get into trouble... I got to thinking... why attach with invisible thread and then shade with pastels... Why not shade and attach in one step. So, I used an irregular zig-zag stitch on my machine and stitched the left sides of the tree trunks with a dark poly thread and the right sides with a light gray poly thread... I love my results! I think it is shaded better than what I did on previous work with the oil pastels. And, I loved being able to thread sketch som

Funky Bear is finished

Image
I have finished Emma Kate's baby quilt and will get it in the mail to her tomorrow. I added a bumble bee on one of the flowers because this summer we had a family reunion and called it the "Buzzin' Cousin" Reunion. Everything was bumble bees... even on our tee shirts that we made. Well, Emma Kate will be the newest "Buzzin' Cousin" when she soon arrives. I also took the scraps from the quilt, added a daisy flannel fat quarter and made a mini quilt to keep in the diaper bag. That way Emma Kate's mommy will always have a clean place to put that cute pink bottom when changing the diaper on the go. So here is Little Funky Bear all finished... He is so very cute! Now I'm free to start working on my art quilt projects. I'm anxious to get back to the trees! Keep stitchin' for the ones you love! Hugs from Mary

Little Funky Baby Bear

Image
     Oh I love this sweet little bear... Even if he is a little funky. I just need to bind - which is the lime green/pink flowered strip, launder, and mail him to sweet Emma Kate.      Little Miss Emma Kate is due to arrive any day.  I'm hoping Funky Bear will give her lots of hugs and love. I put soft, soft flannel on the back side of the quilt. It should all puff nicely when out of the dryer it comes. I love stitchin' for the ones I love. Hugs from Mary   PS... Don't forget to enjoy the Ghastlies Blog Hop... The blogs are in the right margin.

FMQ Rule #1

Image
Free Motion Quilting Rule #1..... NEVER sew a stitch that is too small to be ripped out!   Learned that one the hard way. I'm working on a darling baby quilt for my niece.  I was doing free motion on the bear and decided it didn't look right...  The picture says it all: I've always used the seam ripper and trimmer shears for undoing the mistakes... My new favorite tools include tweezers and the tape roller for picking up the tiny pieces of thread. Didn't really accomplish what I wanted to... Off to the grocery store. Hugs from Mary

Ghastlies Sneak Peek...

Image
I've just finished my Ghastly project for the Blog Hop over at Madamme Samm's ,  beginning  October 24th. I'll be featured with other blogs on November 2nd.  Here's the sneak peek of my project....  Any ideas on what I might be making??? It's functional, chic, and I will use it often, especially through the Holiday Parties coming up. Such fun fabric to work with. Love the pea green soup background color. I may need a new LBD... (little black dress!) Hugs to all, Mary

Crooked Gulley??

I thought I better mention where my blog name comes from... I live on Crooked Gulley Circle! It's the name of my street. AND... I'm not the one who misspelled gulley... Maybe the post office? Maybe the plantation developer? Maybe some lackey sign maker? Who knows... But, the important part is:  yes, there really is a crooked gully! By the way, the wedding was beautiful and the bride loved her garters. Keep stitchin' for the ones you love! Hugs from Mary

For the Bride

Image
This weekend we are going to the wedding of our daughter's friend... a very good friend from 5th grade. I wanted to make her something special to wear on her wedding day... Something old, something new, something borrowed, something blue. It's all wrapped up in these garters. The 'old' is a penny for the year the bride and groom were born. The 'new' is a new 2011 penny for the year of their wedding. Both pennies hang from the bow of the top garter in tulle 'pockets'. Something borrowed... well, I'm still working on that one... Something blue is, of course, the blue garters. I also added a small bit of rice for the traditional rice at the wedding. (Don't tell the bride, but it really means fertility, or, in other words... start making babies!!!) I make two garters for the brides because the top one is a keepsake and the bottom garter gets thrown to the bachelors.  I once did garters for a wedding on the beach. The center of the bow had tiny se

Autumn Birch Trees - Confetti Method

Image
Hello dear friends... I have really jumped into the deep end. I'm not sure I'm still on Planet Earth! I took a leap of faith today and tried confetti style landscape quilt art! You have to take all your precious batik scraps and cut them into the tiniest pieces and then sprinkle them where you think they might go! Shut the front door! Has someone lost their mind? How can you just sprinkle little fabric pieces and think it will work out??? Well, let's take a look... I haven't even stitched and enhanced the trunks yet... and, I plan to "sprinkle more yellow leaves along with a few orange and red. I'm anxious to see what is going to happen... But, that will have to wait... My sweet husband, Dick, and I are leaving tomorrow morning for the NC mountains and a wonderful week at Lake Lure with hiking, golfing... dining out... yum! I guess I have to leave my machine at home. Darn! But, while we are out sight seeing, I have a planned route that will take us by two

My, oh my! Hot Apple Pie

Image
I've just got to tell y'all about the apple pie recipe in the September edition of Southern Living . Just feast your eyes on this... My DH found it and made it!!! This luscious pie is made and baked in a cast iron skillet.  Before you put the crust in you make a caramel sauce. A nice gooey caramel sauce. Then you put the crust right over it in the warm pan. Add the apples according to the recipe, put the crust lid on top, paint it with an egg and sugar mixture and bake. My, oh my... Hot apple pie! Here's the recipe link: http://www.myrecipes.com/recipe/easy-skillet-apple-pie-50400000115371/ Yum! Hugs from Mary

Another Sunset Beach Wall Hanging

Image
Welcome Autumn weather! Our humidity is nearly gone and we now have cool nights. So, that means take picnic dinners to the beach, walk, swim, relax and watch the sunset. How on earth can that happen on the east coast of NC? When you look at the map of the eastern USA, you will see that a part of NC juts in and faces south. That's where we are. We sit on the beach and realize the sun rises on our left and sets on the right. Very weird feeling when you're trying to get your bearings. So... with all this lovely evening beach time I start thinking about a quilt hanging. Here's the beginning. Not much to look at yet. I've done several things. I want a calm evening ocean, so the free motion stitching in the blue is relaxing simple lines. Perhaps I'll only stitch in a few white caps with the white silk thread. I'm also going to add a small amount of the white foam at the edge of the water with the same thread. The dunes are not going to be as large as the area appea

Tree Tops is Finished!

Image
This is it! I'm finished... well, almost. My DH needs to make a wooden frame so that I can wrap the edges around it and staple gun it all in place. About a quarter inch will show of the outer border on the front and then it will wrap around and show on the sides. I also need to clean finish the border edges with a nice quarter inch hem so that it looks finished and neat on the back. I take lengths of grosgrain ribbon and glue it down to cover the staples.  This piece is going into a local art gallery for sale and I want a professional looking back. One of the things I've done on this since last posting it was to create more contrast in the trees. I made the right side shadows on the trunks darker. I also used a white oil pastel and made the left sides of the trunks brighter. I then took an olive green oil pastel and added mossy areas to the trunks. The trees seem to pop more from the background and I like that better. This has been a great experiment, and I gained confidenc

In the Tree Tops Project Lesson

Image
I'm working my way through Nancy Zieman and Natalie Sewell's book: The Art of Landscape Quilting .  The first project spins off of Sewell's art quilt In the Tree Tops . These talented ladies claim it is an easy one to start with as there is no ground cover and it is a close up view. As they recommend, I used only three fabrics. They do a very good job of teaching you how to enhance the tree trunks and background with fabric markers and oil pastels. I'm not disappointed with the book. However, I may be overly criticizing my first attempt, or.... maybe not.  I shadowed the right side of the trunks with black Sharpee Marker and black oil pastels. It takes a lot of nerve to draw on a lovely batik with a black marker! I found I could soften the effect by going over the stark black with gray oil pastel. Then I took a deep breath and forged on. It was very scary! My background trees do not look like the authors. I guess when they do I'll write a book. The authors ad

Progress...

Image
Long time, no blog.... Company, golf, gardening...  I WANT TO GO TO MY SEWING ROOM!!! And, I did. Here's my latest progress on Elizabeth's "Early Riser".  I did the leaf and vine free motion quilting around the border, and stitched details into the mountains. I was also able to get to my latest art quilt. I thought the trees needed more shadowing. I added charcoal oil pastel down the right sides. I also drew in more background trees and branches. I think I'm ready to look for the border fabric. Oh Goody! I get to go to a quilting store. What a wonderful was to spend a Saturday. Of course I also have to help Amber, my daughter find a pair of silver dress shoes for a wedding she's going to be in. I think she should just buy some metallic silver spray paint and cover a pair of shoes she already has. :-) Hey... Keep stitchin' for the ones you love! Hugs from Mary

Early Riser

Image
We're making progress!! " Early Riser ", a pattern by Mckenna Ryan, is now past the fusing process. You can see Elizabeth doing the final steps for the little salmon swimming up stream. While Elizabeth was busy with the fusing, I was over at another work area doing my own creating. I have been wanting to do an art quilt that uses fussy cutting and drawing with oil pastel chalks, fabric markers and what ever else works. So here is my morning endeavor: This is from " The Art of Landscape Quilting " by Zieman and Sewell. The book has wonderful instructions and pictures. This is the first project they suggest. So, I can't believe it, but I'm actually following directions. How about that? The leaves are fussy cut, and I enhanced them with a yellow fabric marker. I shaded the tree trunks on the right sides with a black sharpee marker. I drew in additional smaller trunks in the background, and highlighted some of the background fabric with a red/orange oil p

Newest project

Image
Here it is... A Mckenna Ryan pattern. Just the beginning...  I'm working on the free motion quilting, my friend, Elizabeth, is doing the intricate cutting and fusing. Next we add the spectacular fish! This is a beautiful, fun pattern. More to come...  Keep stitchin' for the ones you love! Hugs from Mary

Floor Cloths Can Go Anywhere!

Image
This is just a post script to the floor cloth idea... I would love to make one to fit inside our "wooden" rug in the foyer. I originally proposed to my husband that we sand the center and paint/stencil it. I watched a grown man cry!! The vinyl floor cloth will be much easier on him. :-)  I also want to use a toilet rug as a pattern and make vinyl floor cloths to use around the toilets... so much easier to clean and I can get a tighter fit.  Just think how cute they could be in the kids' bathroom! Floor cloths are not just for the kitchen! Keep stitchin' for the ones you love! Hugs from Mary

Make a Classy, Sassy Cell Phone Cover... Part 2

Image
This is the cute, sassy cell phone cover I  started making several years ago. It is my own pattern that I'm giving to you because everyone needs to pull a cell phone out of a Classy, Sassy Cover ! We're going to make this one today... You need:  1   crazy quilt piece that is 8.5" x 9".                                            1  8.5"x9" lining fabric in a contrasting color or print                                              1  8.5"x9" piece of fusible lining like Wonder Under                                  1.5" of hook and loop closure  such as Velcro  If you don't know how to crazy quilt , take a look at the blog entry just below: Classy, Sassy Cell Phone Cover Part 1 . It has the "how to" for crazy quilting . So, here is what my crazy quilt fabric piece looks like. I didn't quite have the 8.5" length, so I added a strip of the gold star fabric at the top of the piece.  I am also using that same