Posts

Showing posts from 2013

I've Found Mary!!

Image
Talk about being the lazy blogger........ I win the prize!!! Where in the world have I been? I lost myself to company, travels, projects, gardening, cleaning (which is what I should be doing), reading... Company started in March and appeared every month through yesterday. Last night my husband and I sat at our little bar and toasted the quiet normalcy with a wonderful vino rosso. We almost giggled knowing that no one was going to appear until our daughter comes home for Thanksgiving. Don't get us wrong... We love to have visitors from California. We catch up on all the news of our old school district. I love finding out about my former first graders and what they're up to. And, we do live by the beach. CA people love our beach because it is warm. The Atlantic vs the Pacific is like No Wet Suit vs Wet Suit! The pacific is cold!! But, now we're alone. It's quiet. I need to pull weeds.   Forget that! I NEED to quilt. I'm going back to work on the Italian quilt an...
I just love the action around my neighborhood. Check out this gator at  Oyster Bay Golf Course

It's For the Birds... Blue Birds!

Image
Welcome & Thank You to Mary Winegar and Madamme Samm for organizing and officiating this event!  I'm sharing a Blue Bird table runner today. The basic directions for making the table runner can be found several posts below. Also... Hope you notice that I have a "Bird Series" tab above.  Take a look...I love to do egrets and herons! I made this runner as a birthday present for a sweet lady who  loves beige and Blue Birds! The runner can also be hung as a wall art panel. The three blue bird sections are 8.5 X 11...  Yep, you guessed it! I used my regular ink jet printer. All you need to do is iron freezer paper on the back of the fabric, carefully cut it to printer paper size, and then just feed it through fabric side down. I chose pictures from a public domain site,  making sure they predominately had a beige background. Once I had the pictures printed on the fabric, I pulled the paper off the back. I s...

Koi Table Runner

Image
I just finished this table runner using the pattern/directions  in a previous post a week ago.  The backing and border is one long hunk of  fabric 1/2 yard wide. This pattern is so very easy. The basic design is to sew a long tube and then finish the ends. The picture below shows how I used one of the many machine decorative stitches  to outline the picture/border I backed the blue fabric with a fusible interfacing to stabilize the fabric  for the Free-Motion quilting process. I did not do any stitching on the blue - just the FMQing on the koi.  When I use a metallic thread I use a metallic thread needle. The eye is larger and the thread feeds smoothly. The soft pink blotches were created by using Ink Tense Colored Pencils and a water color brush. The pattern for the koi is from Java House Quilts  .  Remember... Keep Stitchin' For the Ones You Love! Hugs from Mary

New Wall Hanging

Image
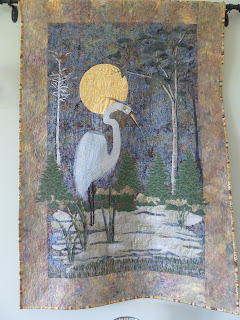
Well, as you can see in the previous post, I have donated the oak tree quilt and now have a bare wall above my old treadle machine. Here is the replacement.  We have so many Great Blue Herons and Great White Egrets that inhabit our coastal salt marshes. We even have a large rookery where both types of birds nest high in the pine trees surrounding a pond. It is not unusual to see six to eight nests in a single tree. It is real apartment living! I tried some new skills on this hanging. I wanted the full moon to have texture so I did areas of small circles.  To the left of the moon I made a large nest in the dead tree by using a technique called needle lace.  It is not a heron nest, they prefer pines.  This is a typical Osprey nest which can be found everywhere in our neighborhood. Right now the females are sitting on eggs. The chicks usually hatch late May into June. The picture below shows marsh grass. Rather than stitching it dow...

Relay For Life Donation

Image
Final Update... And the winner is... Betsy Slover, one of my many Sea Trail neighbors who bought raffle tickets. Congrats to sweet Betsy... a breast cancer survivor! I'm thrilled, Betsy is thrilled, American Cancer Society is thrilled! UPDATE... Thanks to the genrosity of many, I was able to sell nearly $500 in raffle tickets!! Thank you! I am donating one of my favorite art quilts to my Relay For Life Team ~ The Sea Trail Strollers.   We are selling raffle tickets for $5 each. The quilt measures 36"X50", is based on a pattern by Nina Stevens, and made of beautiful batiks and prints. All $$ for raffle tickets must be received by Friday, May 3rd. So, Hurry!!! And, GOOD LUCK

April Showers Mug Rug Blog Hop

Image
Welcome! So happy you could stop by to visit on this beautiful spring day. Erin Davis  and Madamme Samm  have done a fabulous job of scheduling and coordinating this event...  To them I send ~   A Grand Thank You! My mug rug is a bit on the large size and does not have a thing to do with rain, showers or April. In fact, I should have saved it for next month's bird blog hop. But it is the one and only mug rug I've ever made, and I just love it.  (Oddly enough, so does my DH) It all started with this litte table located in our cozy reading corner of the kitchen.    It's functional because it holds magazines and has a lamp.  However, the top is not real wood! Tacky!  And, our kitchen is pretty nice... We love its open style and views.  Enjoying coffee there in the morning is quite nice. I wanted a nicer looking table. That little table was just screaming... MUG RUG! We have a bird fee...

A Birthday Present from my Sweet, Talented Sister

Image
My sister, Georgia Enid, is so, so talented.  Just look at this beautiful, spring table runner she made for me! A special birthday present for moi. This is a super easy pattern. No quilting or batting involved.  Just straight stitch sewing.  A very good project for the beginning seamstress, or a quick project for the expert. Directions For the Quick Six-Seam Table Runner Fabric for 14" X 41"  1/2 yard for runner back and borders 1/4 yard of second fabric for center accent Directions:  Straighten cut edges and remove selvedges from both fabrics Lay fabric right sides together, matching the long cut edges of the crosswise grain. Using a 1/4" seam, sew each long side together, creating a tube. The 1/2 yard will be wider than the 1/4 yard, and this creates the border along the center accent. Press the two seams open then turn the tube inside out. Center the accent fabric so that borders are about 2" wide a...

This and That

Image
I've been working on a few things... The Italian quilt is still my main project. I want to update the last post about stitching over the Glad Press N Seal. It is easier to pull off if you stitch over it once, peel, and then go back over the stitching (if you want). I stitched my design several times and then peeled. Wasn't quite as easy as I thought it would be! Also, I wanted the design to look like the rod iron you see in Italy... I needed a heavier thread. Below you can see where I re-stitched. I like the look so much better, and should have used it from the get-go. You can see, in the photo above, the difference between the heavier thread and regular thread. I just wish my FMQing skills were better. Hopefully time and practice will work that one out. I needed a break from the Italian quilt, so I have started another heron. This one is much bigger than my usual ones. It measures 44x30. I've already ripped out the tree on the right. I want to put in shadow like t...

Transfer A Pattern for FMQing

Image
I have been working and working on the Italian Quilt! What a project I've gotten myself into. I wanted to do a lot of swirly stuff by way of FMQing... But, I needed a pattern to follow. Simply put, I needed a cheat sheet because I can't just pull beautiful designs out of my head and make my hands perform. I needed lines on the fabric so that I could follow them. I came up with....  Glad Press'n Seal , a book of designs I could legally copy, and my imagination. For those of you who don't know, Glad Press'n Seal is sticky on the back side and will adhere to whatever surface you place it on... In this case it's paper and then reapplied to fabric. I copied the design/designs and put them together in the overall pattern that I wanted. Then I laid the Press'n Seal over the paper and traced the design with a Sharpy black marker. Then I carefully placed the Press'n Seal exactly where I wanted it on the fabric and made sure it was nice and stuck on t...
Image
The Italian Quilt ... I've started the quilt for our queen size bed. The design is based on our wonderful trip to Italy this past fall. The part that covers the bed is my interpretation of the beautiful marble floor and frescos we saw in the duomos. I am going to build the quilt in sections and then sash it all together. So... I'm about ready to build the quilt sandwich (add the batting and backing) and start the machine quilting. I will stabilize it all together by stitching down all the seam lines with a walking foot, hiding the stitches by stitching in the ditch starting in the center and working out. Then I will put in the free motion quilting... This is where I need help/ideas!  I have no idea what the design should be!