Tanner's T-Shirt Quilt
Long time no post! I've been busy remaking a T-Shirt quilt for my niece's husband, Tanner. He has a collection of t-shirts from his adventures at Camp Olympia in Trinity, TX, both as a camper and a counselor. His mom had the t-shirts made into a quilt, but the lady didn't use the correct fabric color and the finished quilt wasn't quilted at all... it was tied with random tufts of yarn (again, the wrong color). So, enter Aunt Mary... "I'll redo that for you!"
Yikes... It took a while to rip all the squares apart. It took a while to remove all the bits of thread. It took a while to cut all the new backing squares (in red, the correct color). And, it has taken more than a while to quilt all the squares! The caveat for me is knowing that my niece's little girls are going to have so much fun discovering all the letters and eventually reading all the words that I FMQed around. Plus, it was all great practice in FMQing for me!
There are 16 squares in all... but I'm only going to show a few...
Remember I am limited in colors I can use. The fabric must be red... So, the backing on all the squares is just good old bright primary red, and I have red thread in the bobbin. All of the quilting is done with a thread the same color as the background.
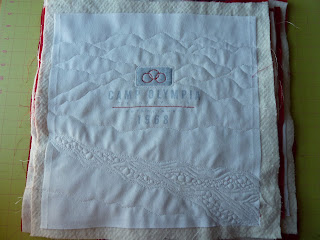
This first block shows the hills of Texas, and a stream bed.
I wanted to practice a leaf and vine fill. Besides, the word Olympia just screams olive branches!
Here I used black thread and enhanced the cliffs in the picture. I wanted a rugged, rocky background for the FMQing. It looks really jerky because that was my intention.
This picture was fun! I traced around all the wording and then quilted lightening bolts and circles all over the background. The center really POPS!
I loved doing this picture. I used white thread and traced the picture and letters. I restored the picture by stitching the clouds back into the moon. They had worn off from many washings.
This is what I inherited from the first quilter. She cut up three shirts and put them into one square. I started with the center panel. Using white thread, I traced around all the surf boards, and then carefully traced over the lettering. Great practice for delicate work. Next I moved to the bottom panel. Using a rusty orange thread, I went around all the flowers and the main rectangle. Finally I did the top... Kept it simple by just stitching around the edge of the stripe and then traced over the letters.
This picture looked like it could be a sun to me.
I traced around the letters and the symbol, and then added the rays.
Now I get to put it all together. I'm going to use Marguerita McManus' technique for that. She and her daughter, Sarah Raffuse have written a wonderful book, Crazy Shortcut Quilts. Instructions are clearly laid out, and the process is not difficult to master. Marguerita has now written an additional book, Finish (almost) Any Quilt. Great book! Shows the process even better and explains all different kinds of quilt block patterns to use. You can find out more here.
That's it for now. My mind is scrambled. I'm off to walk the neighborhood.
Keep stitchin' for the ones you love... That's what I'm doing!
Hugs from Mary


I enjoyed seeing all of the blocks, it will look fabulous when you get it all together!
ReplyDeleteYou did a fantastic job on the blocks , great detail , it will be loved~!
ReplyDeleteSuch incredible work! We are so excited about this project. This will be a treasure in our family for years and years to come! I can see the girls taking this with them to camp when they go to remind them of home! Thank you so much, Aunt Mary!
ReplyDeleteI really love the detailed photos of your quilting and it is particularly inspiring because I am starting a new tee shirt quilt now. Thank you so much for showing the blocks and the backs, I love your inspiration for each quilting design :)
ReplyDelete