Posts

April Showers Mug Rug Blog Hop

Image
Welcome! So happy you could stop by to visit on this beautiful spring day. Erin Davis  and Madamme Samm  have done a fabulous job of scheduling and coordinating this event...  To them I send ~   A Grand Thank You! My mug rug is a bit on the large size and does not have a thing to do with rain, showers or April. In fact, I should have saved it for next month's bird blog hop. But it is the one and only mug rug I've ever made, and I just love it.  (Oddly enough, so does my DH) It all started with this litte table located in our cozy reading corner of the kitchen.    It's functional because it holds magazines and has a lamp.  However, the top is not real wood! Tacky!  And, our kitchen is pretty nice... We love its open style and views.  Enjoying coffee there in the morning is quite nice. I wanted a nicer looking table. That little table was just screaming... MUG RUG! We have a bird fee...

A Birthday Present from my Sweet, Talented Sister

Image
My sister, Georgia Enid, is so, so talented.  Just look at this beautiful, spring table runner she made for me! A special birthday present for moi. This is a super easy pattern. No quilting or batting involved.  Just straight stitch sewing.  A very good project for the beginning seamstress, or a quick project for the expert. Directions For the Quick Six-Seam Table Runner Fabric for 14" X 41"  1/2 yard for runner back and borders 1/4 yard of second fabric for center accent Directions:  Straighten cut edges and remove selvedges from both fabrics Lay fabric right sides together, matching the long cut edges of the crosswise grain. Using a 1/4" seam, sew each long side together, creating a tube. The 1/2 yard will be wider than the 1/4 yard, and this creates the border along the center accent. Press the two seams open then turn the tube inside out. Center the accent fabric so that borders are about 2" wide a...

This and That

Image
I've been working on a few things... The Italian quilt is still my main project. I want to update the last post about stitching over the Glad Press N Seal. It is easier to pull off if you stitch over it once, peel, and then go back over the stitching (if you want). I stitched my design several times and then peeled. Wasn't quite as easy as I thought it would be! Also, I wanted the design to look like the rod iron you see in Italy... I needed a heavier thread. Below you can see where I re-stitched. I like the look so much better, and should have used it from the get-go. You can see, in the photo above, the difference between the heavier thread and regular thread. I just wish my FMQing skills were better. Hopefully time and practice will work that one out. I needed a break from the Italian quilt, so I have started another heron. This one is much bigger than my usual ones. It measures 44x30. I've already ripped out the tree on the right. I want to put in shadow like t...

Transfer A Pattern for FMQing

Image
I have been working and working on the Italian Quilt! What a project I've gotten myself into. I wanted to do a lot of swirly stuff by way of FMQing... But, I needed a pattern to follow. Simply put, I needed a cheat sheet because I can't just pull beautiful designs out of my head and make my hands perform. I needed lines on the fabric so that I could follow them. I came up with....  Glad Press'n Seal , a book of designs I could legally copy, and my imagination. For those of you who don't know, Glad Press'n Seal is sticky on the back side and will adhere to whatever surface you place it on... In this case it's paper and then reapplied to fabric. I copied the design/designs and put them together in the overall pattern that I wanted. Then I laid the Press'n Seal over the paper and traced the design with a Sharpy black marker. Then I carefully placed the Press'n Seal exactly where I wanted it on the fabric and made sure it was nice and stuck on t...
Image
The Italian Quilt ... I've started the quilt for our queen size bed. The design is based on our wonderful trip to Italy this past fall. The part that covers the bed is my interpretation of the beautiful marble floor and frescos we saw in the duomos. I am going to build the quilt in sections and then sash it all together. So... I'm about ready to build the quilt sandwich (add the batting and backing) and start the machine quilting. I will stabilize it all together by stitching down all the seam lines with a walking foot, hiding the stitches by stitching in the ditch starting in the center and working out. Then I will put in the free motion quilting... This is where I need help/ideas!  I have no idea what the design should be! 
Image
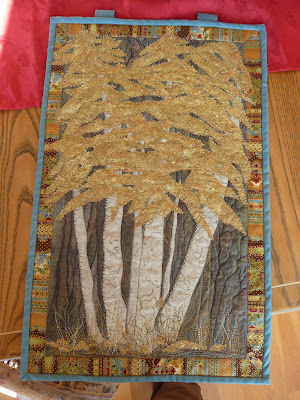
I've just finished two wall hangings.  This first one is for my niece who has a cabin at Lake Tahoe. As you explore around the lake you will see clumps of Aspen, which are a beautiful sight in the fall. I relied on my memory of the aspens to create this art quilt. It is a modified confetti method. This piece measures about 16X28". I used a batik background and drew in shadowy trees with a black sharpie. The aspen trunks are Stonehenge marble fabric. I also used some fine point pens to draw in details of the bark. I used a black thread to do an uneven zig-zag on the left side of the trunks to create a shadow and give dimension.  The leaves are done with another Stonehenge marble. I cut pieces with pinking shears. I used a  basting spray on the background fabric and then laid the leaf sections on the tacky surface. To make sure it was all secure, I overlaid a dark gray netting and then zig-zagged the edges of the leaves with gold metallic thread. This next art qu...

Dress-Up Betsy Pillow

Image
Pattern found in Wee Wonderfuls by Hillary Lang. The pillow measures 16”x16”. The back has a velcro closure. A pocket on the back holds the dolls wardrobe. The clothes stay on the doll because they all have flannel fused on the back. Reminds me of the old flannel boards from kindergarten! Hugs from Mary