Posts

Wooden Quilt Address
Image
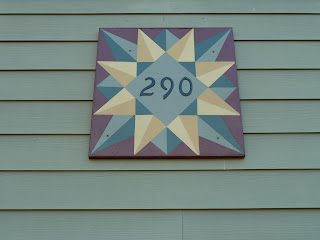
The quilt block is finished and attached! The darling DH getting the job done!  The big picture... Our sweet little dream cottage on the golf course; near the beach  now has a beautiful quilt to showcase the house numbers! The neighbors probably think it's part of the Christmas decorations. Won't they be surprised when it stays in place forever! BTW... The window above the quilt block is my sewing studio. I get the whole room over the garage all to myself! I'm just a happy camper up there ;-) Keep stitchin' for the ones you love! Holiday Hugs from Mary

Wooden Quilt Block... Finished... almost

Image
I'm finished!!! After lots of taping and delicate painting, I can now say... "I love it!" Our address numbers will stand out bold and proud on this quilt block.  The exterior of the house is the same color as the center light sage green. So, drum roll please... here it is... The next step is to spray a clear satin polyurethane to seal and protect the paint. After that DH and I will seal the plywood edges with a waterproof clear caulking and put a wood fame around the edges that will be painted the maroon/brown.  When I get the barn quilt square hung on the house with the numbers I'll post it. By the way...Head on over to Tops and Bobbins for a "Thankful" give-away! Keep stitchin' for those sweet loved ones. Hugs from Mary

Wooden Quilt Block for my house.

Image
Earlier this fall my DH and I were in the NC mountains, and adventured into Burnsville to find Needle Me This , a quilt store that had been featured in a quilt magazine. The entire shop was wonderful, but the entrance was spectacular. Right beside the front door is a beautiful painted 3'x3' quilt square, typical of what you see on barns in the NC mountains. I fell in love with that quilt block and knew that I wanted to do a smaller version of it with slightly different colors.  Here is the beautiful quilt block at Needle Me This. I am staying in the same color range, however I am not using the white and light blue. On those points I am using the light and dark gold.... And then where you see the golds in the picture I am changing that to the light and dark greens. My quilt block will be 2'x2', and our house numbers will be displayed in the center diamond. So, here is what I have to this point... Yes, I'm painting in the kitchen... on the granite counter-top......

Proper Dress Attire for Quilting

So Dick, my DH, comes home from golf... (which means he left 4+ hours ago)... looks at me and informs me I'm still in my PJs at 2:00 in the afternoon.  I of course tell him that I'm dressed..(I've even pulled on a pair of shorts). But he won't accept that! It seems I'm still in the t-shirt I slept in.  Now here's the part I like... if you pull on a bra, technically you could go outside, so technically you're dressed... Right??? I've even brushed my teeth, had coffee, cleaned the kitchen... Hey! I'm more creative in a comfy t-shirt! Miss Puny Puss, my quilting buddy, is quite content with my appearance. I've got a plan... someday soon Mr. Dick is going to come home from golf and I'm going to be dressed in that cute little black dress, cute black strappy sandals, dangly earrings, make-up, the whole nine yards! This will by my attire for the quilting studio! Who on earth am I kidding? I'm sticking to the comfy t-shirt and pull on pants! We...

"Hang it on a tree" Postcards

Image
I needed to write several thank you cards to friends. I decided to send them each a quilted postcard. I fused a fabric Christmas ornament onto a crazy quilted background and then started having some fun... Using free motion quilting, I stitched in some pine boughs. However, here's the kicker... I used a double needle!!!! How do you like that?! What a fun discovery. I used two different colors of green and went to town with a back and forth motion. It was easy to do and I love the effect. On one of the postcards I stitched in the branch with a variegated brown/black polyester thread. On the other card I just drew in the branch. Do you see the difference? I also discovered that by going side to side with a double needle I got one thick line of the two colors. Just curving slightly gave another effect. For the back of the card I fused muslin and wonder under together. I then trimmed the edges to 8.5" X 11" and ran it through my printer to get the tiny label at the botto...

Completed on time... Beef Wellington!

Image
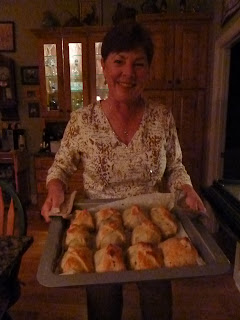
I did it! I got down to task and completed the Beef Wellington... despite numerous interruptions from my sewing machine. Every time I went upstairs to grab something my sweet sewing machine would make me lose track of what I was doing... Hours later I would think, "Oh, the gourmet group is coming for dinner tomorrow night! Shouldn't I be cooking and cleaning rather than sewing?" So here is my proof that I stayed on track, cleaned, cooked and set a beautiful table. Yeah! I look so cool and calm... Ha! What a joke! Keep stitchin' for the ones you love Hugs from Mary

Sidetracked by a postcard!

Image
Gee... wasn't I going to clean the house and then prepare the Beef Wellington?? It's only 11:10, I still have time. I was sidetracked by my friend's birthday. It's all Elizabeth's fault!! I went upstairs and there was my sewing machine begging for a few minutes of my time. I started thinking Elizabeth would love a postcard for her birthday. She would really love a picture of an egret in the salt marshes... it will only take a few minutes... I can justify anything! What fun! I think she will be very surprised! I'll be grateful if it even makes it! Keep stitchin' for the ones you love! Hugs from Mary